Monday, October 15, 2012

Chai Frappuccino Cupcakes


For my Aunt's recent birthday I decided to make her favorite Starbucks specialty- Chai Frappuccinos- in the form of cupcakes!!
These adorable deserts can be made two ways- the 'Vanilla Chai' way or the 'Chai Spice' way. I chose Vanilla Chai for this batch for a milder, sweater taste.
Makes 24 cupcakes!

Ingredients:
-1 box French Vanilla Cake mix (for vanilla chai)
OR
-1 box Spice Cake mix (for chai spice)
-1 can heavy vanilla frosting
-powdered chai tea mix (I used oregon chai, found at local grocery store)
-Any ingredients needed for the box cake mix (in my case 3 eggs and a quarter cup of oil)
-Cupcake liners & pan
-Ground Cinnamon 

Supplies:
-green Starbucks straws (about 8 for 24 cupcakes)
-Starbucks hot/cold sleeves (atleast 24)
-Stapler & staples
-Scissors
-Ruler

Step One:
Bake you cupcakes!
Follow the instructions on the box for ingredients and amounts.
When adding dry ingredients, also add 4 tablespoons of powdered chai mix.
Make sure all ingredients are well blended (I beat batter on high for about 3 minutes).
Bake cupcakes as box instructs and let cool completely in pan (mine took around 30 mins total).

Step Two:
Mix your icing.
(This step is optional)
For an extra burst of chai flavor mix powdered chai into icing!
Approx. 1.5 tablespoons for an entire can of frosting. Blend well!

Step Three:
Make cupcake sleeves!
Cut straight lines across sleeves using ruler & scissors.

Undo the glue that holds the sleeve together. Then measure around the cupcake and staple sleeve where  it will fit around the cupcake bottom. Trim excess cardboard. Make sure the bottom of the sleeve is nice and even- the cupcake will rock if it's not! 


Place completely cooled cupcakes into sleeves.

Step Four:
Decorate!
Using a pastry bag (or a plastic baggie with the corner cut off) ice the cupcakes started on the outside brim and circling inward. This will make the icing look like whipped cream!
Top icing with ground cinnamon (a little goes a long way). 

Cut green Starbucks straws into thirds and place one straw in each cupcake.


Enjoy!


Monday, October 1, 2012

Craft Obsession: Martha Stewart Paint


So for this weeks craft obsession I bring you Martha Stewart. The goddess of craft herself has her own line of craft, baking, and party decoration supplies. I'll admit I think that it's WAY overpriced but the line has a lot of nice quality products. My advice: wait for a sale (the paints especially go on sale a lot at my local Michaels & Joann Fabrics) OR check out stores such as Marshalls or TJ Maxx.. the last time I was at TJ Maxx they had Martha Stewart packaging kits (adorable for candy & cookies) for 10% of the price they were selling them at Michaels (which happened to be right next door... awkward).


I'm obsessed with Martha Stewart craft paint because the dried paint is extremely true to the color on the bottle. I hate when I buy what I think is a hot pink and end up with a sad orange. No such fear when it comes from Martha! The paint also covers evenly in only a few coats and comes in a variety of adorable colors. I love all the matte paints and the glitter ones as well (although glitter takes a few more coats). I can't wait to try the chalkboard paint!

Using Martha Stewart craft paint you can create this adorable jewelry box!


Supplies:
-Wooden Jewelry box (I got mine at Michael's)
-Wooden cut-outs in fun shapes (great selection at Pat Catan's and Hobby Lobby)
-Martha Stewart craft paint (any kind/ color)
-Brushes
-Tape

Step One: Paint the whole box a base color such as white or cream- this makes the colors more vibrant.

Step Two: Paint away! Use painter's tape to make striped or other designs (or to keep edges clean). Make sure that all the paint is dry before closing any drawers or lids!! Wet acrylic will stick like glue!

Step Three: decorate wooden shaped and glue onto box! I made this for my little cousin's birthday!


Friday, September 21, 2012

The Morning Doodle 2


Morning doodle time... as always, made possible by instagram. 
A few things from a previous painting class... and doodles on shrink-a-dink plastic (yes that's right- shrink-a-dinks. they're awesome.)


Happy Friday!!

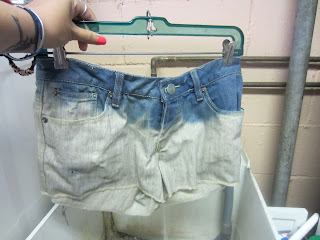
Ombre Bleach Shorts DIY


In my previous post about DIY Ombre Dye Shorts I mentioned that you could also use the technique with bleach! I tried it on a couple pairs of shorts- here are my instructions & do's and don'ts!

Supplies
-1 pair of denim shorts or cutoffs (the thicker the denim the better)
-plastic tub
-bleach
-vinegar
-a yard stick or pants hanger
-gloves
-Make sure you are doing this outside or in a well ventilated area!

Step One: Take your pair of shorts and run them under water. Don't soak them just make sure they are damp all over. I tried two different pairs of shorts (both found cheap at forever 21).
***I learned that THICKER denim with LESS ELASTIC works the best. The stretchier the shorts- the more elastic and less denim that's in them. Bleach will disintegrate the elastic and you'll be left with some really thin shorts.

Step Two: Fill a bucket with bleach. Prepare a tub of vinegar and water for when you're done bleaching (probably not on carpet like I did).


There are two methods to bleaching your denim 


-Method one: The Perfect Ombre-  hang shorts above bleach with hem submerged (either by hanger or string belt loops on a yard stick to balance on a bucket) Make sure hem is submerged evenly (A hair clip in the middle of the hanger helps shorts hang evenly and not droop in the middle). Now let sit for 20-30 minutes. The bleach will creep up the denim (easily because you pre-wet the denim). This gives a more even ombre effect and turns out in a straight(ish) line.


**This method is recommended for strong denim jeans because they sit in the bleach for so long. I originally tried with a thinner, more elastic pair and though they look awesome- they are super super thin now.

-Method Two: The Splash Dye- hang shorts above bleach with hem submerged (either by hanger or string belt loops on a yard stick to balance on a bucket) Make sure hem is submerged evenly. Let sit for five to ten minutes so that the hem is bleached. Then put on your gloves, pick up scoops of bleach and scrunch it onto the denim. You can pour, dribble, flick, splash- whatever you want on the shorts (be careful of your clothes, skin, and eyes!) This makes for an interesting tie-dye look. My personal fav!

before (I cut off the folded hem too):


 after:

Step Three: Once you have finished dying your shorts place them in a bucket of vinegar & water to stop the bleaching process. Then wash your shorts by themselves!

I should really just be a spokesperson for bleach- I'm obsessed.


 (yes I am wearing my skull cutout tank)

helpful hint for avid bleachers: if you accidentally leave on silver jewelry while bleaching (like I always do) no worries- you haven't ruined it! Take off that dark oxidation by placing the jewelry in non-gel toothpaste. Let it sit for a bit and and then use a toothbrush to remove the oxidation! Toothpaste is amazing!!!

Little Boxes


Are you automatically singing the little boxes song in your head now? I know I was the entire time I was making these. (don't know what I'm talking about?  just watch an episode of weeds or listen here, it's addicting.)

Anyway, cute little boxes are the perfect way to snazz up a tiny gift! For my mother's last birthday we got her a charm bracelet and instead of having one jewelry box to open I places a charm in each little box.


Supplies
-craft/ scrapbook paper (mine is from a paris-themed pack I found at Joanns)
-scissors
-glue/ glue stick/ glue dots
-pencil
-ruler
-printer
-embellishments (stickers, ribbons, flowers, glitter, whatever)

Step One: Print out a box template. You can find them in pretty much any size or shape by simply googling "box template". You can print out a different template for every size and shape or you can just adjust one using a ruler (which is what I did). Here's a great little jewelry box template: link
Cut out the template.

Step Two: Trace the template onto the backside of the scrapbook paper. I'm awful with strait lines so I always use a ruler as well. If you want to extend the sides of the box so that it is taller just add the same amount of space to each side of the box. A taller box will have the same size lid. Make a box larger by creating a larger inner square. You then must increase the lid the same amount as well (for an easier solution to a bigger box, just print the template larger).
*Try mix & match paper patterns for bottoms and lids! The great thing about buying paper packs is that they usually contain the same pattern in different colors. 

Step Three: Cut the box out of the craft paper. Fold along the four sides of the inner square and the tabs. Really make the folds crisp by laying them on a flat surface and pressing along the fold with the ruler. Glue along a tabs to connect each of the sides and do the same for the lid. Do not place the lid on top of the box (no matter how tempting) until the glue is completely dry. 

Step Four: Put the presents inside the boxes with some cute tissues paper, close em up and decorate! Ribbons and bows are always great for presents but you can also use stickers, glitter, cloth embellishments, buttons, flowers, stamps, twine, more paper- the skies the limit.

Check out my finished birthday boxes below!


Skull Cutout Tshirt DIY


With halloween just a month away I'm really getting into the skull spirit. I've always had a lot of skull print t shirts but when I discovered the skull cut-out tshirt trend I fell in love.

They have beautiful versions at Zara (black) and Urban Outfitters (white)


but if you're anything like me you have issues spending upwards of thirty bucks on a shredded tshirt. 
Easy solution- DIY!

Supplies:
-1 old tshirt, preferably baggy/ oversized
-scissors
-newspaper
-1 sharpie 


Step One: Draw the skull on the back of the tshirt. Place newspaper inside the shirt so that the sharpie doesn't bleed through. Remember to add "strings" through the eyes and nose so that the shirt doesn't just have big holes in it. I looked at a reference skull as a drew it (you can find one here).


remember to vary the size of the teeth, and curve them to give the skull face a rounded shape.

Step Two: Cut out the negative space. Cut slowly and carefully. Make sure you don't cut any of the "strings" and space teeth far enough apart so that the cloth between them doesn't get cut or rip. You want individual little teeth, not blobs. Don't get frustrated- this takes a while. Try to cut off all of the sharpie lines.

You can distress other places on the shirt as well by cutting small holes or lines in the sleeves, sides, or whatever for an especially grunge skull tee.

 Step Three: CAREFULLY pull at all of the "strings", in between the teeth, and everywhere that's thin. The fabric will stretch and curl in a bit, making it thinner. This makes it look more like a naturally worn tshirt than one you cut out. Washing the shirt on a GENTLE cycle will help too.


and voila! Now you're the chicest & creepiest kid on the block. 


It can even double as a spooky halloween decoration! (just kidding- but how cool does that look?!)