Wednesday, January 9, 2013

Christmas Peppermint Tie Dye Cupcakes


Your favorite Tie Dye Cupcake with a holiday twist!

Ingredients:
-Your favorite vanilla cake mix (white cake works too.. but it's a little to light & airy of a cake to handle the dye well... the texture came out a little off where there was no difference when using vanilla cake mix)
-Whatever other ingredients your cake mix calls for.. in my case eggs, water, and vegetable oil 
-Red & Green Food Coloring (I prefer Wilton's brand)
-Optional Red and Green sprinkles or edible flakes
-Candy Canes
-Pillsbury Vanilla Mint frosting

Step One: 
-Make the cake batter according the the directions on the box. 
-When the batter is completely blended and smooth, separate into two bowls o
-Slowly add dye to bowls. Remember, a little bit usually goes a long way so blend completely before deciding if more dye is needed. Also keep in mind that no one wants to bite into a bubble of dye so blend completely... and then blend even more.


Step Two:
-Line your tin with cupcake liners. 
-Layer spoonfuls of the red and green batter in each liner. The smaller the spoonfuls (and the more layers) -the more of a tie dye effect you'll get. 
-Fill liners 3/4 of the way (or whatever the recipe calls for)
-DO NOT try to swirl or mix the different colored batter! This will only make it turn a muddy greyish/ brown. LAYERING ONLY!!

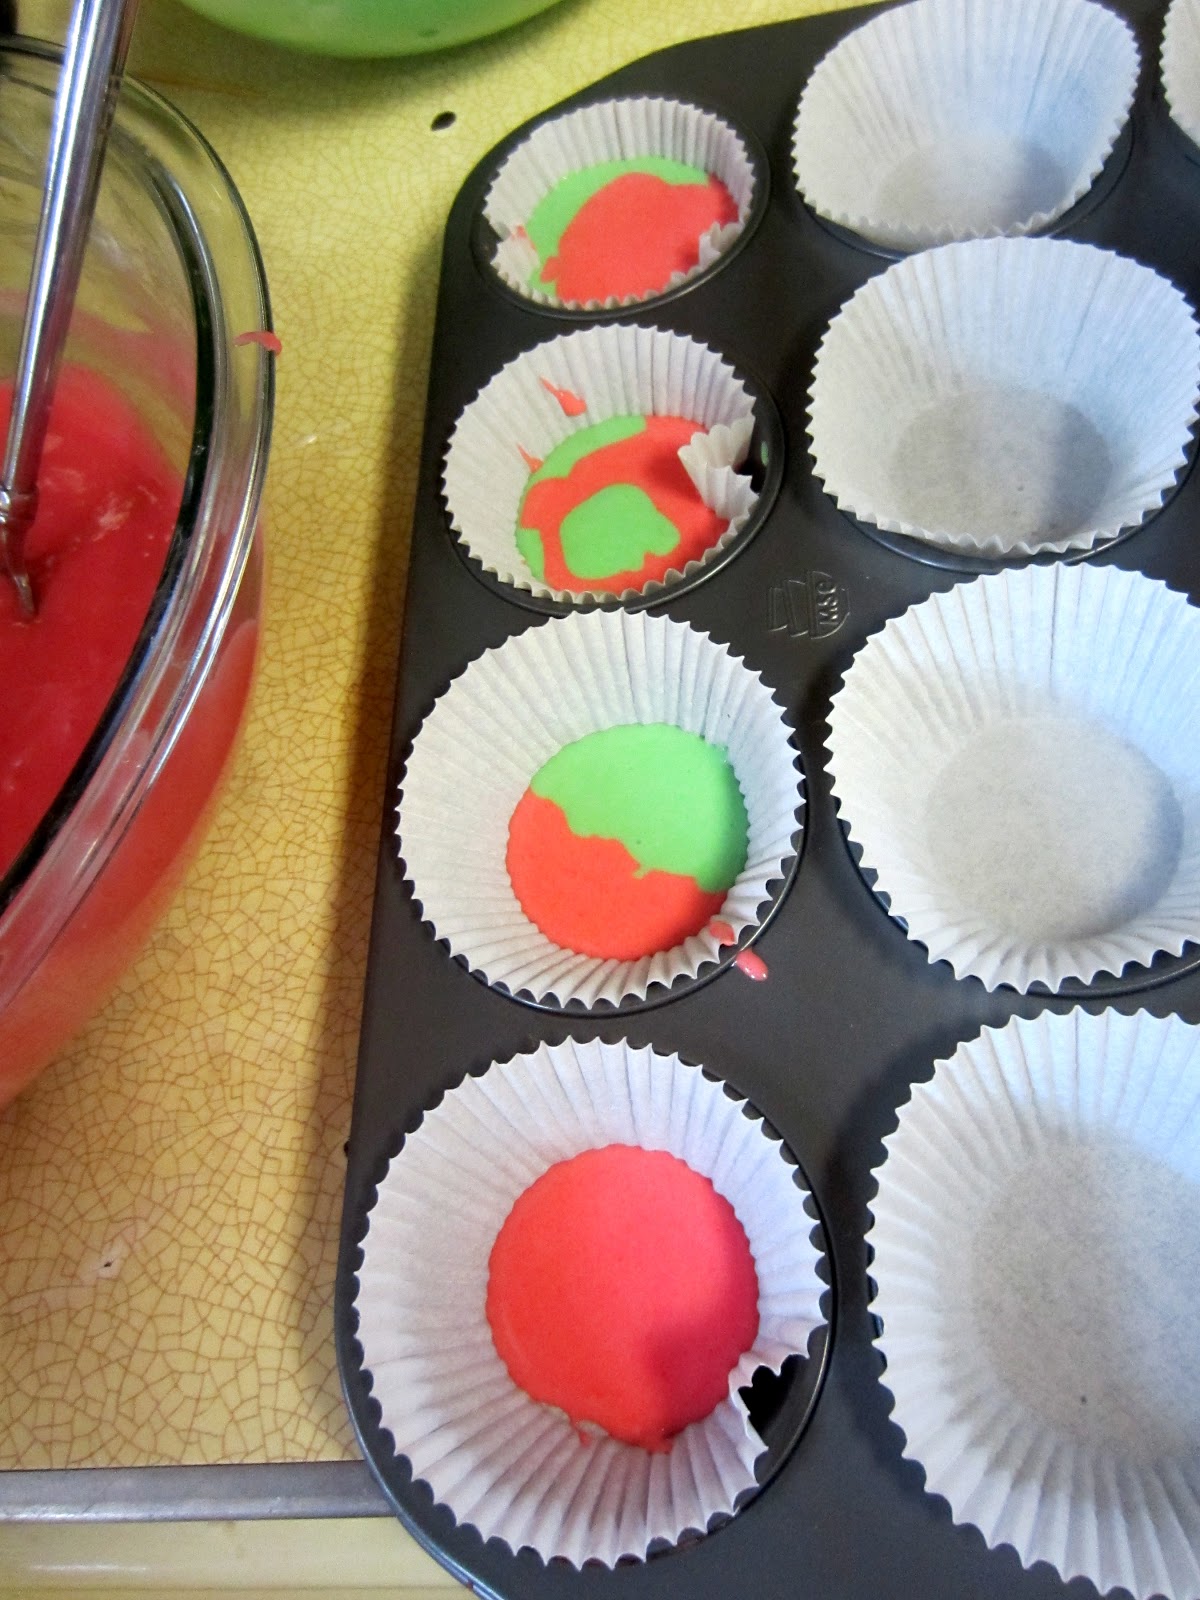
Here you can see the layering progression: the bottom liner only has one layer with the top having four.


All Done!


-Step Three:
-Bake for as long as the recipe on the box calls for!
-Remember you added an ingredient (the dye) so a little extra baking time may be needed! Just be careful and keep an eye on your cupcakes!


Step Four:

-Decorate!
-After your cupcakes have cooled, ice them! I dirty- iced these cupcakes with a knife and canned vanilla mint frosting (beware: it is very minty). To top off the cupcakes I used edible red and green sparkle-flakes and crushed candy canes. I found the gingerbread man cupcake wrappers at Joann Fabrics.


Aren't they the sweetest? 


Tie Dye Cupcakes


The most fun you will ever have making cupcakes- I promise!!
And they're super simple!!


** I apologize for not having many pictures for this DIY- but check out the tutorial for Christmas Peppermint Tie Dye Cupcakes - there are many more pictures that explain the process! 

Ingredients:
-Your favorite vanilla cake mix (white cake works too.. but it's a little to light & airy of a cake to handle the dye well... the texture came out a little off where there was no difference when using vanilla cake mix)
-Whatever other ingredients your cake mix calls for.. in my case eggs, water, and vegetable oil
-Vanilla Frosting 
-Food Coloring (in a bunch of different colors) .. I really like Wilton brand food dye because it has a nice, thick consistency and the littlest bit still packs a big punch of color!

Step One: 
-Make the cake batter according the the directions on the box. 
-When the batter is completely blended and smooth, separate into small bowls or custard cups (one bowl for each color you would like to use)
-Slowly add dye to bowls. Remember, a little bit usually goes a long way so blend completely before deciding if more dye is needed. Also keep in mind that no one wants to bite into a bubble of dye so blend completely... and then blend even more. 

Step Two:
-Line your tin with cupcake liners. 
-Using a different spoon for each color, layer spoonfuls of various colored batter in each liner. The smaller the spoonfuls (and the more layers) -the more of a tie dye effect you'll get. 
-Fill liners 3/4 of the way (or whatever the recipe calls for)
-DO NOT try to swirl or mix the different colored batter! This will only make it turn a muddy greyish/ brown. LAYERING ONLY!!

-Step Three:
-Bake for as long as the recipe on the box calls for!
-Remember you added an ingredient (the dye) so a little extra baking time may be needed! Just be careful and keep an eye on your cupcakes!


Step Four:
-Decorate!
-After your cupcakes have cooled, ice them! I used a plain vanilla canned icing and an icing bag and topped it off with colored sugar sprinkles!


I love how the wrapper looks when you take it off of the cupcake! Enjoy!! 


YUM!

Monday, December 31, 2012

DIY New Years Glitter Pouch Favors


It's almost New Years and for me that means one thing.. it's time for GLITTER! I made these cute little glitter pouches for my friends to throw up when the clock strikes midnight!

Supplies:
-Glitter, Confetti, Sequins
-Glitter Paper
-Hole Punch or Pattern Punch
-Mini Bags
-Decorative Paper
-Stapler & Staples
 -Marker


Step One:
-Pour all matching glitter/ sequins/ confetti into a bag and shake!
-Optionally you can make your own confetti by punching holes (or other shapes) from glitter paper!


Step Two:
-Separate glitter mixture into little baggies (a small amount will do fine)


Step Three:
-Write out a little poem or design and staple it to the top of the baggies. 
-I wrote on mine: 
"The Clock Strikes 12
Everyone Cheers
Now throw your glitter-
Happy New Years!"


Now pass out and enjoy! Happy New Years everyone!!


DIY Glitter Heels


I saw a tutorial for DIY glitter heels a while ago on Pinterest.. and I loved the idea, but the process involved layers and layers of Mod Podge and TONS of loose glitter. Now, I love Mod Podge but it takes forever to dry and gets all sticky and I really don't think I have the patience to do an entire pair of shoes. So I found an easier way!


Supplies:
-An old pair of heels (mine are from Target)
-A can of Krylon Glitter Spray in a SIMILAR color to your shoes (it's much easier to make the shoes look)
-Krylon Glitter sealant

Step One:
-Prepare!
-Make sure there isn't any dirt on your shoes
-Lay down newspaper in a well ventilated area- the glitter will get everywhere.


Step Two: 
-Spray Shoes with glitter. Seriously it's that simple.. put your hand inside the shoe and evenly spray the shoe while steadily turning it.
-Let the shoes dry, assess how glittery the shoes are, add another coat of glitter if desired (check for missed spots too).


Step Three:
-Spray shoes with Krylon Glitter sealant for protection and voila!

There's no place like home!


Sunday, December 30, 2012

DIY Holiday Bunting Flags


Who doesn't love a good bunting flag? They can be used for any occasion- baby shower, birthday, wedding, and in this case- Christmas!

Supplies:
-Large (12x12) Double-sided scrapbook paper (trust me, it's a lot easier to use)
-Ribbon
-Paper Glue or Rubber Cement
-Stapler & Staples
-Dimensional dot stickers
-Ruler
-Scissors (Regular, and scalloped)
-Scrap Paper (to make pattern)
-Optional stickers/ letters/ decorations

Step One:
-Make your pattern!
-The first triangle should be 5" across the base and meet at a point 6" from the center (2.5") of the base. The picture is much easier to understand:

-Then you need the larger triangle which has a base of 5.5" and extends 6.25" from the center of the base .

-Cut the triangles out and align them so that the bases are touching and the smaller triangle is centered to the bigger triangle. Tape together. (Note: if you are not using double sided paper, keep the triangles separate and use one for each pattern)


Step Two:
-Create your flags!
-Trace the pattern onto the double-sided paper and cut it out!

-Now fold where the triangles meet (the points should not touch, you want to create a border)


-Repeat this step until you have as many flags as you want for your banner- my "ho ho ho" banner needed 12 flags. 

Step Three:
-Figure out the order you would like the flags to go in.
-Take your ribbon and place it between the two sides of the flag (underneath the fold)
(Note: if you used one-sided paper try putting tape between the two triangles at the base to mimic a fold)
-Staple the flag to the ribbon (I used one staple in each corner)
-Continue to staple all of the flags in a row along the ribbon, do not allow for any space between the flags but also be careful not to overlap them. 
-Once flags are stapled, glue the smaller triangle to the larger so that it doesn't flap up. 

Step Four: 
-Decorate your flags. 
-For the "ho ho ho" flags I used scalloped scissors to make a bordering circle, then a normal smooth circle, and then I hand-drew the letters (you can use sticker letters if you like). I layered them using dimensional sticker dots. 


-I used designs from the left over paper to fill in the extra flags 


When you're all finished- hang your banner! They look great over a mantlepiece!