We all love the Ombre hairstyle the exploded overnight… gracing celebrities from Drew Barrymore to Rachel Bilson. There's something wonderfully funky and elegant about the change of color- so why limit it to just hair?!
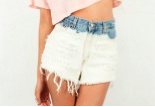
Ombre dying methods work on clothes too! The graceful fade from one color to another has been seen all over the runway and in our favorite stores- check out these adorable pink shorts from Topshop.com and the subtle mint and denim ones from Freepeople.com:


You don’t have to spend big bucks to have funky one of a kind dyed clothes though- just follow these simple steps for an ombre-tastic article of clothing!
Supplies:
-Fabric Dye (I used RIT liquid & powder, though I prefer liquid)
-a garment you wish to dye (I did denim shorts & a cotton tank top)
-a large plastic bowl or container
-a hanger or rod to hang the garment above the dye
Supplies:
-Fabric Dye (I used RIT liquid & powder, though I prefer liquid)
-a garment you wish to dye (I did denim shorts & a cotton tank top)
-a large plastic bowl or container
-a hanger or rod to hang the garment above the dye
Step One: Choose an article of clothing (or a few). I grabbed a $10 mint colored cotton tank from H&M and a pair of $5 light denim shorts from Forever21.
Step Two: Prepare the dye. I swear by RIT dye. The colors are beautiful and the product is cheap. You can’t go wrong! I chose Teal for the tank and Petal Pink for the shorts. I find the liquid bottles of dye easier to use because you don’t have to worry about getting powder everywhere and if you don’t use it all you can save it for later! Just follow the directions on the bottle/ package for sink dying- prepare in a large punch bowl or plastic bin.

ALTERNATIVE: try using bleach instead of dye on denim for an acid wash meets ombre result!
It turns out like this awesome pair from Singer22.com (although you don’t have to make it so extreme)
check out my tutorial for bleached shorts here.
check out my tutorial for bleached shorts here.
Step Three: Run your garment under water so that is damp and place your article of clothing on a hanger and hang above the bowl of dye. Hang the garment so only the very bottom of the piece is actually submerged in the dye (use your own judgment here- if you want the dye to be very strong half way up the garment then place half of it in the bowl- but the dye will creep up and go higher than what is submerged).

Step Five: Take the garment out of the dye and rinse in the sink until the water runs clear- make sure not to get any dye on the top part of the garment.
Step Six: Wash garments separately WITH a little bit of detergent. Dry however the garment requires and….


VOILA! Awesome ombre clothes- perfect for spring and summer! Now you can turn it around and ombre the top in another color or add embellishments- the skies the limit.